Accessing Secure Credentials in a Jenkins Pipeline

Accessing Credentials Stored in Jenkins Securely in a Pipeline Job
For several months now, I’ve stopped creating Freestyle Jenkins jobs in favor of using Jenkins Pipeline to manage all of my CI/CD processes, for a number of reasons.
One of the first things that I needed to figure out was how to securely access the credentials that are stored in my Jenkins server into my Pipeline jobs. Specifically, how could I get things such as Ansible Vault passwords, AWS credentials and other secure documents such as private keys injected into my workspace.
Given that it took a bit of tinkering to figure out how to pull it off, I thought I’d share some snippets to get some of my fellow engineers in the community bootstrapped.
First, for those that are new to Jenkins Pipeline, I’d like to start off explaining some of the benefits of using Pipeline jobs, then we’ll dig into how we can leverage our credentials.
Top-level items covered:
- Benefits of Using Pipeline Jobs
- Creating a Basic Pipeline Job
- Leveraging AWS Credentials Stored in Jenkins
- Leveraging Ansible Vault Credentials Stored as Strings
Benefits of Using Pipeline Jobs
Here are some of the key things I appreciate from Pipeline:
- Build processes are source-controlled and described as code
- You get visualizations and metrics for each stage you define in the process
- Isolated visibility into the stdout/stderr output of each step in the Pipeline
- Full transparency to development teams into what build team/DevOps has configured
- Provides top-level visibility into what part of the build/deploy process failed
- Useful to quickly identify if a command like Webpack failed to run.
- Minimizes time spent investigating and troubleshooting in some cases.
- Tabular insights into how long each stage normally takes to run.
- Perhaps the testing phase is taking much longer than usual after adding a new test.
- Embraces the idea of a DevOps culture – true collaboration between Dev-and-Ops
- Makes it easy to parallelize parts of your build process, without writing scripts.
- Enables granular control of SCM checkouts, without needing additional plugins.
Creating a Basic Jenkins Pipeline Job
So first, you’ll want to click the ‘New Item‘ link in the top-left hand corner of your Jenkins console.
Provide a name for your Pipeline job, select the ‘Pipeline‘ job type and click ‘OK‘.

Once you’ve created your job, you can configure the repository that you’d like Jenkins to pull. This repository should contain your Jenkinsfile file. This is where your Pipeline’s operations will be specified.
If your Jenkinsfile is located in the root of your repository, your configuration should look like the below:
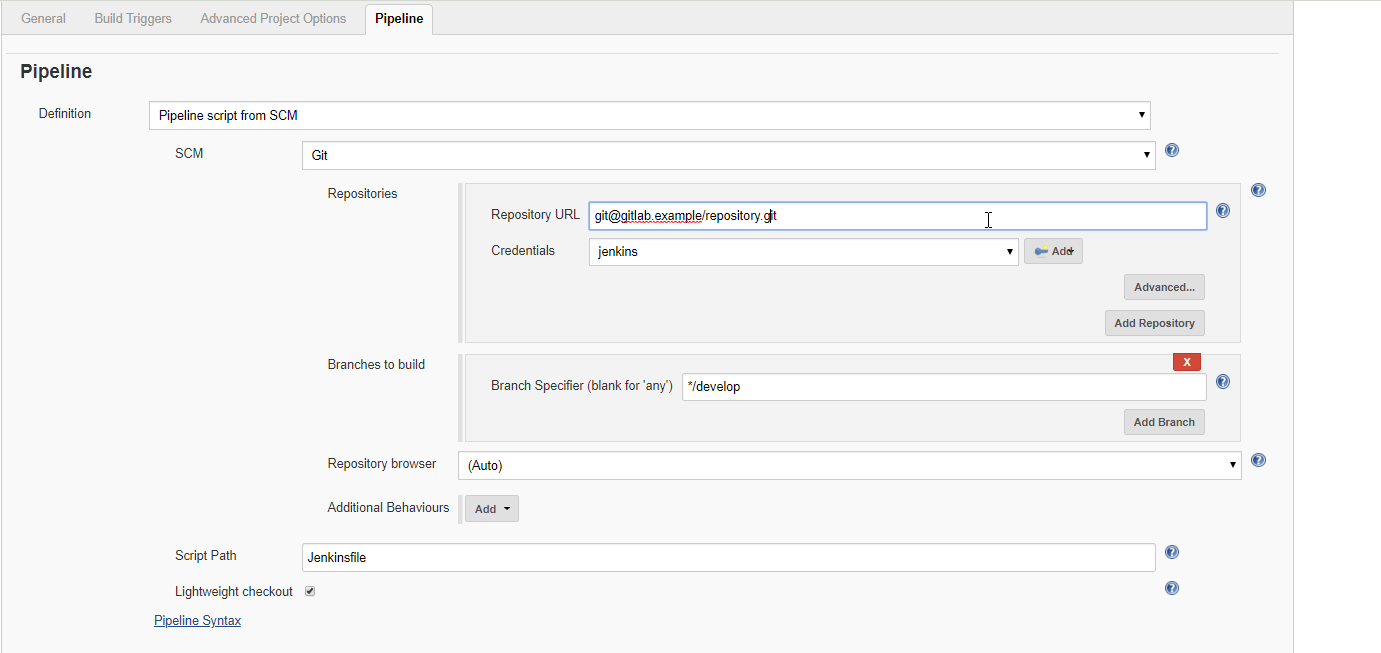
Each of the columns below is a ‘stage‘ in your Pipeline.

Here’s a basic example of a Pipeline Jenkinsfile that builds a Go binary, archives it and cleans up after it’s done.
pipeline {
    agent any
    stages {
        stage('Build') {
            steps {
                echo 'Build code here'
                sh "go build -o application"
                sh "zip application.zip application"
                // Archive the build artifact for downloading via Jenkins project screen
                archiveArtifacts artifacts: 'application.zip', fingerprint: true
            }
        }
        stage('Deploy') {
            steps {
                echo 'Handling deploy logic here.'
            }
        }
    }
    post {
        // This block always runs
        always {
            // You can cleanup key files, etc. here.
            sh 'rm ./key.pem'
        }
    }
}
Using Jenkins Secrets in Pipeline
So now that we’ve detailed some of the perks to using Pipeline and how to create a basic project that leverages a Jenkinsfile, let’s dig into credentials.
Prerequisites:
Leveraging AWS Credentials Stored in Jenkins
Here’s an example Pipeline stage that demonstrates how one can access AWS credentials stored as Jenkins credentials in our build.
Note: The double-quotes around the shell command are required.
        stage('Build') {
            steps {
                // Example AWS credentials
                withCredentials(
                [[
                    $class: 'AmazonWebServicesCredentialsBinding',
                    accessKeyVariable: 'AWS_ACCESS_KEY_ID',
                    credentialsId: 'aws-dev-credentials',  // ID of credentials in Jenkins
                    secretKeyVariable: 'AWS_SECRET_ACCESS_KEY'
                ]]) {
                    echo "Listing contents of an S3 bucket."
                    sh "AWS_ACCESS_KEY_ID=${AWS_ACCESS_KEY_ID} \
                        AWS_SECRET_ACCESS_KEY=${AWS_SECRET_ACCESS_KEY} \
                        AWS_REGION=us-east-1 \
                        aws s3 ls clouductivity-demo"
                }
            }
        }
Leveraging Ansible Vault Credentials Stored as Strings
Here’s how you might go about retrieving a secret text such as your Ansible vault password in a Pipeline job. Don’t forget to add the post{ always {} } to ensure sensitive information is cleaned up afterwards.
Replace AnsibleVault with the credential ID you find in the credentials management screen within Jenkins.
pipeline {
    agent any
    stages {
        stage('Build') {
            steps {
                // Example secure string retrieval for Ansible vault password
                withCredentials([string(credentialsId: 'AnsibleVault', variable: 'vaultPass')]) {
                    // Create virtualenv
                    sh "virtualenv ."
                    // Install Ansible module
                    sh "./bin/pip install ansible"
                    // Create our vaultpass file
                    sh "touch ./.vaultpass"
                    sh "chown jenkins:jenkins ./.vaultpass"
                    sh "chmod 640 ./.vaultpass"
                    sh "echo '${vaultPass}' > ./.vaultpass"
                    sh "bin/ansible-vault decrypt secret-file.pem --vault-password-file ./.vaultpass"
                }
            }
        }
    }
    post {
        always {
            sh 'rm ./key.pem ./.vaultpass'
        }
    }
}
I hope you’ve found this article informative, and I’d like to invite you to check out our product, Clouductivity Navigator – a Chrome Extension to improve your productivity in AWS. It helps you get to the documentation and AWS service pages you need, without clicking through the console. Download your free trial today!
-- About the Author
Marcus Bastian is a Senior Site Reliability Engineer that works with AWS and Google Cloud customers to implement, automate, and improve the performance of their applications.
Find his LinkedIn here.

DevOps Interview Questions
> Read more
5 DevOps Tools We Love
> Read more
PostgreSQL Monitoring with Datadog
> Read more

Tips for Getting AWS Solutions Architect Professional Certified
> Read more
Scaling Postgres in AWS and Google Cloud
> Read more

Hiring DevOps Engineers: What You Need To Know
> Read more
Running an ECS Task on Each Cluster Machine
> Read more

Implementing AWS Parameter Store
> Read more

Monitoring Your Applications in AWS
> Read more

When to Use AWS Lambda Functions VS Amazon ECS
> Read more

Configuring AWS Credentials with Access Keys, Secret Keys, and IAM Roles
> Read more

Downloading & Uploading Files in Amazon S3 using Python Boto3
> Read more